tagline

life is beautiful

Tuesday, April 26, 2011

Sweet Skirts

I love making these little skirts, and it's so much MORE fun to make them for sweet sisters!  (Thank you dear friends for being my models!!!)


 And guess what?! If all goes as planned, these and lots more like them will be showing up in the shop. 


They're simple, but essentially girly and customizable with zillions of layer and accessory options.

 (Cute, even on super-sleepy baby girls...)


So much fun.

They are versatile and sweetly simple, but the details are solid, too, with overlocked seams and special finishes at every turn.


They can come in Mommy sizes too.... more photos and ideas coming soon! :)

Sunday, April 24, 2011

This Sunday is REALLY Special!

The angel said to the women, 
“Do not be afraid, 
for I know that you seek 
Jesus who was crucified.  
He is not here, 
for He has risen, 
as He said. 

Matthew 28:5-6

Friday, April 22, 2011

Before and After #3

A dear friend handed a bunch of lovely pillows down to me several years ago.... and I'm feeling the need to refresh some of them, and this is the first one I tackled:


I wanted to re-use the cording or welting for the edges, so I ripped it out as I took off the cover...


I was unpleasantly surprised to find this lump of smushy "fill" inside the pillow!  In order to help the new cover have a smooth look, I covered this "filling" with the remnant of a much-loved crib sheet.  I measured the old cover and used it as a pattern for both the insert and the new cover...


I also made my own bias tape to cover the piped edges of this pillow (from scraps I had from my little lady's pleated crib skirt), following this method (without the folding/ironing step).  (I'm not 100% sure that bias tape is really necessary.  It's a pain to make!  Yes, I do understand the theory, but.... before I knew I was "supposed" to use bias tape, I just used a rectangle of fabric and clipped the edges of any curves, and it worked like a charm!) I used the old casing as a pattern to know how much bias tape I needed for my new piping.


I created my piping and sewed it into my cushion cover (you can read about one way to do this here), turned my cushion cover right-side-out, stuffed it and sewed up the open side nice and tight. :)


Here is the finished pillow, along with a sneak peek or two of some of  upcoming projects.....


Lovely, spring-y and refreshed. Ahhhhhhh....
Now what is going to happen to this messy couch?? 


Here is a super-secret-sneak-peek of its "before."  It's an Ethan Allen couch and it cost $15 at a yard sale.  Now let me just say that if a picture could carry a smell, you'd never come back to this blog!

Thursday, April 21, 2011

Our Passion Week Object Lesson (A Visual Parable)

This year we were inspired by this post (and this one, and this one!) to create our own Resurrection Garden.


Trey and I had such a wonderful time digging up moss and hunting up the perfect rocks, visiting our friend Mary Ann at the store to buy the perfect plants to supplement what we found in our yard...


And we talked as we created - about what Jesus was doing the week before he died, about what His friends were doing, about what His enemies were doing, about Who was really in control, about Jesus' attitudes of thanksgiving and servanthood, about His amazing love and sacrifice and love and pain and His LOVE.


Our church will have a beautiful service on Friday night to remember Jesus' suffering, and afterwards we will come home and symbolically close up the tomb, then on Saturday we will wait and remember, and on Sunday!  Oh, on Sunday when Trey wakes up, the stone will be rolled away, and we will read about what happened that glorious morning and we, in turn, will also have a glorious morning of remembering Jesus' power and love and LIFE.


I'm so excited about this visual lesson - it is opening up so many wonderful conversations with Trey.  We plan to make it our yearly Easter tradition!

The Little Man's Room - I

When we lived in North Carolina, I did my first stenciling project in our little buddy's room, pulling the colors from a handmade quilt made for him by two of my childhood friends.


 Isn't he the sweetest little chunk of sweetness??  He sure loved those puppy dogs. :) :)


And he still loves books this much.... I hope he ALWAYS does!  
My amazingly talented artist-Mom painted this little bookshelf for him.  Delightful!

Wednesday, April 20, 2011

The Little Lady's Corner

Before our little lady was born, I wanted to make her space really feminine and soft, and since she can't have her own room right now due to space issues, her "decor" had to also coordinate with our master bedroom.  This beautiful shabby chic collection from Target was my ideal look:


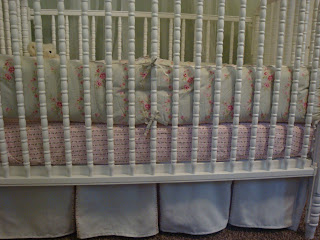
AND it worked with the two green paint colors (which I can't change) on our walls!  Because I soo love to "do on a dime, anytime," I searched around and got the bumper for $10 + shipping from ebay (it was brand new!) and made a pleated crib skirt by following this wonderful tutorial for her crib (which, incidentally, I got for FREE from craigslist and scrubbed/repainted - the crib in my "dream photo" actually might be the exact crib we have. If it's not the very same crib, it's awfully close! :}).  The crib skirt has a textured off-white upholstery weight (from my stash) for the main fabric and this for the pleats:
I also bought enough to make a crib sheet from this tutorial out of the same fabric as the pleats. 

Here is her sweet little set-up,


My lovely friend Sara gave me this soft Pier 1 canopy when our son was born, and I used it in his room when he was verrrry little. I think it will be a permanent fixture in our little princess's room, though.... 

This little corner only looks sweeter with HER IN IT!


One day, when she has her own room, wouldn't this light fixture be DAH-LING?
 
I actually went to Ikea (my favoritest store in the whole. wide. world.) earlier this week and drooled on a few of these.... (!)  

Maybe I could also add an arm chair with this slipcover print:
It would be perfect. :)  
(It's no longer carried by Ikea, but I might score one on craigslist or ebay... hey, it could happen!  I actually saw a single arm chair on display at my "local" Ikea this week - maybe it will go on clearance!)  

AND, walls that are "unapologetically pink," (perhaps Benjamin Moore "Romantic Pink" or maybe "Yours Truly"?)


Tuesday, April 19, 2011

Before and After #2

This project rates... out of anything I've ever done.... as the one I disliked the MOST while I was doing it!
BUT, this project also rates as the one I enjoy the MOST.... out of anything I've ever done.... EVERY SINGLE DAY!

Would you believe that I turned these:


Into these?!


I'm proud to say that the project only cost me about $20 total!  The pair of chairs was free, and I re-used the padding, the cording.... even the upholstery nails.  This project was done on a dime and completely upcycled.  Yay!!!!

I sure learned a lot!  But it will be a while before I tackle this kind of re-upholstery again. Just bein' honest. ;)

They look better in the day time... maybe I'll have to add some daytime photos....  :)

Here are a few process pictures - I was going to do a full-blown tutorial, but I'm sure there are good ones already out there somewhere AND I'm sure there are easier ways to do most of what I "figured out."  But for what it's worth: